Showing posts with label Shimmerz. Show all posts

Monday, May 17, 2010

Doodle Cards -- Video Tutorial

Are you looking for a quick and easy project? Look no further! In my video tutorial, I demonstrate how to make Doodle Cards using text paper, cardstock, machine stitching (optional) and the newest Shimmerz Pearlz.

Here is the doodle flower card that I complete on the video.


I hope that you enjoy my tutorial!


If you are dying to get your hands on those beautiful Pearlz, you can purchase them right here.

Here are pictures of my other cards. I'm telling you...you won't be able to stop at just one!


Happy Creating! Oh, and if you make a card, let me know. I'd love to see it.

xoxo
Bethany Kartchner

Wednesday, April 28, 2010

Flower Frame with Shimmerz and Petaloo

I've always loved gardening so it isn't a big surprise that I also love making flowers in my art. I purchased a metal frame from Target a few months ago because I knew that it would be gorgeous with a few flowers.

And it is...


You can see the detail in the following close-up shots.


I've created a video demonstrating how I made the flowers using Petaloo flowers and Shimmerz Spritz and Pearlz.

This technique is incredibly simple, but I'm loving the subtle results.

I hope that you enjoy it!


If you liked this video and you live in the Phoenix, AZ area, don't forget about my Technique Arsenal class on making flowers on May 22nd. It is only $35.00 and I'll show you how to make 10 different flowers (paper and fabric). It will be a fast-paced class, but it is geared toward both beginners as well as more advanced artists. (By the way, I will NOT be teaching you how to do the flowers in the video as part of the 10.)

xoxo
Bethany

Wednesday, April 14, 2010

Letting it Drip with Shimmerz Vibez--New Video!

I hope that you had a wonderful weekend! I am feeling so renewed and replenished that I'm on a creative roll. I can't wait to show you all the fun I've been having!

I've got a new Shimmerz video for you!

In this video, I demonstrate an easy-peasy-lemon-squeezy technique using Shimmerz Vibez. This technique is so simple (and fun!) that your 6-year-old could do it with you. And since Shimmerz is an easy clean-up and non-toxic, you won't mind sharing a little with your sweetie. (Maybe...)


Have fun!


Here are some non-moving pictures of my finished projects.


Have a great day!

xoxo
Bethany Kartchner

Monday, March 8, 2010

New Shimmerz Pearlz and Vibez Video

Today, on the Shimmerz vlog is a new video. Yeah!

In it I show you how to use Shimmerz Pearlz as a resist with Vibez. I hope that you enjoy it!


xoxo
Bethany

Thursday, February 18, 2010

Doodle Lion

Before I start with my topic, I'd like to answer a few questions that I've received in my comments.

1. Where did you get that fabric? 

I purchased it at a local store in Chandler, Arizona called 35th Avenue Sew and Vac. I stopped in to drop off my sick vacuum and left with a treasure! Happy day!

2. What Shimmerz color did you use on this layout?

Initially, I thought that it was Shimmerz Vibez in Before Dawn. However, yesterday I tried to recreate the look and realized that I used Shimmerz Spritz in Licorice. I hope that I didn't lead anyone astray with this error! Shimmerz Vibez in Before Dawn doesn't have as much shimmer in it so the effect is much more subtle.

Now, I have a question for you.

I've gotten a couple of comments from people who have had trouble using Shimmerz products. I would like to know what trouble you had and what product you used. If you don't feel comfortable publicly commenting, please send me an email. I'm working on a trouble-shooting video and would like to give you real-life solutions to your Shimmering problems. (giggle) Don't worry, I'll change your name to protect the innocent.

Now onto the really fun stuff. I did this art journal page a few weeks ago just for fun. I've been wanting to try my hand at doodling whimsical animals and this is what I did.


Initially my lion was supposed to be a cute rabbit, but he morphed...a...lot...


I used Shimmerz paints, Pearlz and Blingz on his clothes, hair and fur.


I also experimented with another fun technique on these circles. I'll be doing a video later on it so I'll keep it under wraps until then.


While I worked on this page, I felt especially thankful for my husband, Todd, who is such a source of strength in my life. He doesn't get too many layouts because well...the kids are so cute, but he plays a big role in my art journal pages because in some ways, they are more intimate and entirely devoted to, ummm, me.


Have a great day!

xoxo
Bethany

Monday, February 15, 2010

Shimmerz Vibez v. Spritz

If you've been wondering what the difference is between the new Shimmerz Vibez and Shimmerz Spritz. Wonder no more! This video should clear everything up.

Enjoy!


Here are the finished tags from the video.


To create the tag on the left, I used Shimmerz Spritz in Ruby (pink) and Shimmerz Vibez in Jeni B. Bleu (blue).

To create the card on the right, I used Shimmerz Vibez in RazzleDazzle Berry.

You can purchase Shimmerz products here.

Happy Creating!

xoxo
Bethany

Wednesday, February 10, 2010

Splash Hearts

I've been having so much fun playing around with my new Shimmerz Vibez. I made these Splash Hearts for Valentine's day using Vibez, muslin, watercolor paper and cardstock. I'm really pleased with the way they turned out.


I made a two part video if you are interested in making a Splash Heart for your sweetie this Valentine's Day.
I hope that you enjoy it! (I apologize for the doorbell and dogs barking. Oh and the crying baby. Sometimes life happens while I'm trying to be all professional. Darn it.)


Happy Creating!

xoxo
Bethany

Tuesday, February 9, 2010

Lovey

I did this layout with the new Shimmerz Pearlz and with My Little Shoebox papers. I love how the new Teresa Collins colors of Pearlz coordinate so well with My Little Shoebox papers!


I took these pics almost a year ago when Okie Dokie Grandma came to visit. The kids had a blast baking cookies and painting aprons with her.

Here are a few close-ups so you can see how beautiful the Pearlz are.


Materials: My Little Shoebox papers, overlays, chipboard letters; Shimmerz Pearlz, Spritz; Encore pad; Judikins embossing powder; sequin waste; Nikki Sivils brads; vintage buttons; Sharpie pen; Basic Grey chipboard shapes

Monday, February 8, 2010

I Will Protect You Forever

As a mother, I find it incredibly gratifying to observe the sweet relationships between my children. I'm always moved when I see them protecting and caring for each other.

The pics that I took for Protect are absolutely precious to me. I know that I'll be using them again because I love them so much.

I did this layout with Shimmerz Spritz and My Little Shoebox papers.


Materials: My Little Shoebox papers, overlays, letter stickers, chipboard letters; Bazzil cardstock; Shimmerz Spritz; rick rack; Prima bling; Sharpie pen; sequin waste

Here is a close-up so you can see the shimmer. It is gorgeous.


This layout initially was very different. I was planning on using the striped MLS paper as my background, but is just wasn't working so I simply tore out what I had done and adhered it to black cardstock. I've done this before and have been happy with the results. So, if you're struggling with your design, try tearing it out and putting it on a new background, it might just work better.

Happy Creating!

xoxo
Bethany

Tuesday, February 2, 2010

Shimmerz Vibez Giveaway

Hello! Are you as excited as I am about Shimmerz Vibez? I seriously love them! I've been working on multiple projects over the last few weeks that I can't wait to show you!

Vibez are a shot of intense color that will have you amazed. Because they are water-based and non-toxic, they won't stain your hands and they clean-up with a quick wipe of water. Watch this fun video to learn more. (See if you recognize any of the projects in there...giggle.)


Shimmerz will send one lucky winner a bottle of Vibez. All you have to do is leave a comment today on my blog along with your favorite color of Vibez. You can see all the colors right here.

Moreover, if you purchase Vibez from the Shimmerz Shop, you will be entered to win the entire set of 16 gorgeous colors! Awesome!

Good luck! I hope you win!

Friday, January 22, 2010

Playing Around with Pearlz

I've been playing around a lot with my new Shimmerz Pearlz, getting to know the product. I did this art journal page using Pearlz as the background. I incorporated some My Little Shoebox papers, letter stickers and overlays too.


You can see some of the details in my close-ups. While my Pearlz were drying, I spritzed them with some Shimmerz Spritz in Chickadee just to add a little more interest. I like the subtle color.


My journaling was a bit too obvious, so I toned it down with a layer of Pearlz. Now it is all pearly too. Love that!


Materials: My Little Shoebox papers, overlays and letter stickers; Shimmerz Spritz, Pearlz and Paints; Heidi Swapp crown stamp; Autumn Leaves stamps; Encore and Stazon ink pads; charcoal pencil; vintage buttons; Sharpie pen; Prima bling

Wednesday, January 13, 2010

Big Release at Shimmerz

Shimmerz Pearlz have been revealed! There are 5 gorgeous colors that you're going to love for your soft pages. (The blinkie has most of the colors in it.)

If you want to win the entire collection, run over to the Shimmerz blog to find out how! There will be 12 winners today!
Good luck!

Tuesday, January 12, 2010

Heat Embossing on Tissue Paper

As promised, here is my technique video on heat embossing on tissue paper.


You can see how cool the tissue paper looks on my paper cloth. (You will find a video tutorial on how to make paper cloth here.) The tissue paper just disappears and all you see is what I embossed. I love the results!


I also have a little secret...it is called Pearlz...


Shimmerz
is having a grand reveal very very soon. You won't want to miss it! I'm working on projects right now...

Happy Creating!

xoxo
Bethany

Monday, January 11, 2010

Technique Video: Paper Cloth with Shimmerz Spritz

I'm practically bouncing while I'm typing I'm so excited to tell you that my first technique video is up on the Shimmerz Ed Team blog!


If you have some time, I'd love for you to check it out and leave your comments here on things I did well... Things that perhaps I need to improve...

Tomorrow I'll post my video on how to heat emboss on tissue paper. It is the same as embossing on regular paper, but if you've never done that, perhaps my video will give you some confidence to try it out?

Later this week, I'll post the projects that I did using paper cloth along with a more in depth discussion of my process.

Happy Creating!

xoxo
Bethany

Wednesday, January 6, 2010

Shimmerz Vibez Coming Soon

Shimmerz has some very fun stuff coming out at CHA! I can't wait! Here's a sneak peek of the new Vibez.

I know that they've got even more up their sleeves. Stay tuned!

Tuesday, December 22, 2009

Vintage Ornaments with Shimmerz

I recently purchased the Christmas postcard kit from Crafty Secrets and had a lot of fun Shimmering them up with Shimmerz paints and spritzes and Martha Stewart glitter. This is a wonderful kit that I highly recommend to anyone who likes vintage images. I blogged about this in more detail on the Shimmerz blog.

Here are the ornaments that I made.


You can see the beautiful iridescence from Shimmerz Blingz in the close-up.


I think that this one is my favorite. Those birds and that deer just melt my heart.


I used Shimmerz Blingz on the birds to give them extra sparkle.


The tinsel around the edges is from Melissa Frances. Isn't it beautiful?


More Gold Glimmer Blingz for sparkle.


This is one of my favorites too because of the cute children.


This is what the back look like. The kit came with all those stamps. Isn't that the coolest thing?


I used silver chenille stems as hangers for most of my ornaments and while I was heating up the embossing powder around the edge of the postcard, I discovered that silver chenille melts too! It changes into a more vintage looking silver that I'm totally loving. You can see it in the picture above. This may or may not be safe so please be very careful if you decide to melt your chenille, okay? I don't want anyone to inhale toxic fumes or burn their house down.

Happy Christmas!

xoxo
Bethany

Thursday, December 17, 2009

Fingerprint Ornaments with Shimmerz

I'm in charge of the 2-3 year old Sunday School class at church and since Christmas is right around the corner, I wanted to do an easy and inexpensive ornament craft with them.

I came up with this Christmas tree.


Each "dot" is actually a finger print. Lyssie is very proud of her handiwork (or should I say fingerwork?)


If you are interested in making this craft with your sweeties here is what you'll need.

Materials

1. One 8 1/2 x 11 inch piece of white cardstock
2. Red and Green paints (I used Shimmerz royal red and celery because they are non-toxic and so pretty!)
3. Brown paint (I used acrylic.)
4. A star of some sort. (I used a brad, but a punched star would work too. Or you could even do a yellow fingerprint for a star.)
5. Ribbon for hanging
6. Pencil, eraser, hole punch and triangle template


Directions

Prep-Work
1. Cut 1 ovals out of your cardstock. I used my Creative Memories oval cutters. This made it really easy.
2. Trace a triangle very lightly in pencil (this marks the boundaries of your fingerprint tree.)
3. Paint your brown trunk.
4. Punch a hole and thread your ribbon through the top.

With the Children
1. Paint one finger with green paint and stamp it inside the triangle. Repeat until you have the look you want. You can manually stamp the child's finger, or give them more freedom to do it themselves.
2. Paint one finger with red paint and add ornament accents.
3. Add a star (if desired)
4. Write the child's name and date on the back. Erase your pencil triangle.
5. You're done! Wasn't that easy?

I had a question on my glitter ornament tutorial here. The question was how did I put the spray adhesive nozzle into the ornament. If you look at a can of spray adhesive, it has a spray nozzle that sticks up a bit, I simply aimed the spray into the ornament by placing the nozzle right into the lip of the ornament. I promise that if you buy a can of spray adhesive and an ornament, it will make sense.

I just found out that Shimmerz is featured on the Scrapbook Trends blog! They are doing a give-away so run over there and leave a comment! I hope you win! Good luck!

Sunday, December 6, 2009

Special Delivery: Just for Fun

Last week, I just felt the need to play a bit. I had some new 7 Gypsies papers and some new Shimmerz and I wanted to do something just for the fun of it. It's been awhile since I just sat down and created something totally for me.

Special Delivery is the result. I absolutely love it.


Materials: Pattern Papers, journaling tag, flower, stickers; metal circle: 7 Gypsies, background paper: My Little Shoebox; Hambly transparency; Graphic 45 die cut tag; GCD Studios paperclip; Jenni Bowlin "Read this" sticker; Maya Road leaf; Shimmerz Spritz in Mudpie and Sapphire, Shimmerz in Gold Glimmer; Bazzil cardstock; text page; lace; Ranger ink; Sharpie pen; Stampers Anonymous Stamp; Heidi Swapp letter mask

Here is a close-up of the Spritz. I combined colors. I first spritzed with Mudpie, then while it was drying, I spritzed with Sapphire. The result is a new color. Isn't that fun? (I just posted this tip on the Shimmerz blog.)


My journaling is about Lyssie's crazy hair. It is half straight (in the front) and half curly (in the back). It is wild and free and I adore it. My father always tells me that my hair looked exactly like that when I was 2.


I hope that you had a lovely weekend! We certainly did. This Saturday was the first open Saturday we've had in months and we loved the freedom! T and I combined forces and almost completed our Christmas shopping online, T mowed the lawn and we (as in the kids, not T and I) had fun playing on the swingset and relaxing together as a family. Sometimes having nothing to do at all, is the best therapy!

Plus, thanks to my awesome brother and sister, T and I went out on a date together. It was so fun. We went out to dinner then to Borders to hang out. I hit the magazines and the mixed-media/art section while T looked at the sports section. We met up in the cafe and read to our hearts' content. (Well, not completely, but there isn't enough time in the day to read to our hearts' content...) I learned all kinds of new techniques that I'm dying to try out. Fun fun!

xoxo
Bethany

Monday, November 30, 2009

One Week Journal

The My Little Shoebox designers were given a personalized mini-album from Clear Scraps to alter about a month ago. Since my name is 7 letters long, I decided to do an art journal for a week. I chose a random week (November 1-7th) because I wanted a brief glimpse in my regular life.

This is how it turned out.


I began by painting (acrylic paints), misting (Shimmerz Spritz in Cotton Candy), and stamping (Inque Boutique) the background. I chose three colors: pink, yellow and baby blue along with white and black. This kept the project cohesive.


I adhered my My Little Shoebox chipboard letters and letter stickers next. A bit of outlining makes them pop.


Then I cut out tons of images from My Little Shoebox papers and adhered them to the borders of my pages. I pretty much stuck with one theme per letter.


Then I embossed the edges of each letter with JudiKins sparkle silver embossing powder. This was a mistake. I should have embossed when I was all done writing. I went through pen after pen trying to write over stray embossing powder crystals. Darn it.


I tried to write something each day, but I got behind after day two. (Of course) I ended up writing a few days at a time, but I have a pretty good memory so I don't think that it really matters.


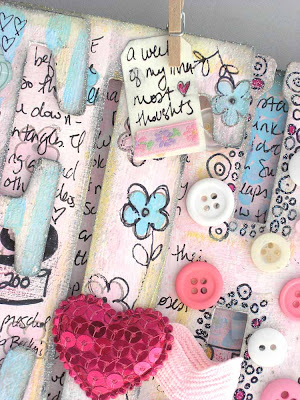
After I finished writing, I embellished like crazy. This, in my opinion was the best part. I added buttons, chipboard elements (Basic Grey), ribbon (Making Memories), rickrack, mini mosaic tiles (Harmonie).


I also added some bling with Shimmerz Blingz in Hi Ho Silver. Wow, that stuff is cool! (See the silver cloud around the date? That is Shimmerz.)


I love how My Little Shoebox papers have so many cool images to cut out! Here's one of my little scenes.


The mini mosaic tiles by Harmonie are another one of my favorite additions. They just add something extra.


I also did a few flowers using My Little Shoebox papers and some Shimmerz Spritz in Cotton Candy. (It may just be my favorite Spritz color.)


I also added some Hi Ho Silver Blingz to the flowers to give them even more sparkle.


This is my favorite date. I think it turned out absolutely perfectly. To make it, I painted a very small border around a Heidi Swapp butterfly mask using yellow. Then after I removed the mask, I painted a little blue border inside. I wrote the date then outlined with a pink colored pencil. The pink butterflies are made of acetate colored with alcohol ink and edged with Hi Ho Silver Blingz again. I can't get enough of that stuff!


I added some ribbons and some Melissa Frances tinsel to the rings to finish it all up.


This was a very time intensive project, but I absolutely love how it turned out!

Now for some less interesting personal stuff. (hehehe)

This weekend, the bigger girls, my friend Sara, and I went to my sister, Mandy's musical: Seven Brides for Seven Brothers. This was D and Z's first live performance (that they can remember) and they were completely enthralled. They were so bummed when the musical ended and asked me if we could go to every performance in the future. It was a lovely evening for us. I'm now looking into children's theater because both of them have serious interest especially Z. (No surprise for those of you who know her...) If you know of any good theaters in the Phoenix area, please let me know. I need some leads.

I just signed up for a cool paperclay class at Mystic Paper in Mesa, AZ. I can't tell you how excited I am. I've always wanted to work with paperclay and now I have the chance! There are still openings if you want to learn how to make this cute guy (look for the Polka Dot Pixie) and hang with me. I've only taken two other live classes (one on soldering and another by Tim Holtz) and each time I complete a class, I experience a major creative high. I love it.

I'm on ScrapScene again with a few Christmas cards. It is always a thrill to appear there!

If you haven't checked out The Next Step lately, you are seriously missing out. Jeanet Kuiper is our guest artist this month and she did a great tutorial on using scraps, paint and misting to make lovely backgrounds.

Oh, and Lucy Edson has a wonderful new video tutorial up on Shimmerz (I was just totally inspired to get misting on fabric after I watched it) and the My Little Shoebox blog has been updated with some fun projects including the DT scraplift results.

Have a wonderful week!

xoxo
Bethany