
Basic Shapes
There are a few basic shapes that you must be able to draw. (See photo A)
They are…
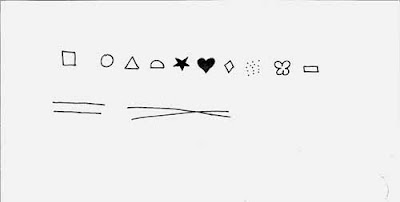
Squares
Circles
Triangles
Semi-circles
Stars
Hearts
Diamonds
Dots
Flowers
Rectangles
Parallel lines
Intersecting lines
If you feel that you cannot do any of the above shapes. Get a pen and paper and practice. Remember, a little messiness is a good thing when it comes to doodling. (If you have trouble with stars, don’t worry, I’ll go over them a bit later.)
Framing
Frames are a great way to reign in a layout. Basically, there are a few ways to doodle frames: A. Draw two parallel lines; B. Draw two lines that intersect every little bit; C. Draw the same shape repeatedly in a line.
Look at Photo B
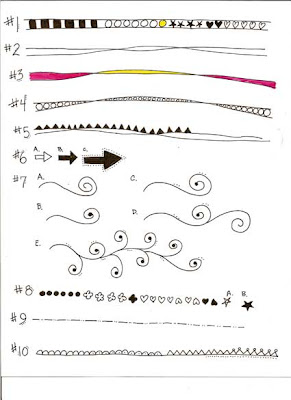
#1 This is two parallel lines that I connected with various shapes to give you an idea of its versatility. You can draw rectangles and leave them open or color them in like I did. You can draw circles, starts, hearts, diamonds, you name it. Add a bit of color, or don’t.
#2 This is an example of two lines that intersect every little bit. This is one of my favorite techniques. You don’t have to use the same color for both lines either. Mix it up.
#3 You can color in the spaces or leave them empty.
#4 Add a shape of your choice. Here I added open circles. Again, you can color them in if you wish.
#5 Here I added triangles to the top line. You could add any shape: open or filled in. You could add shapes to the bottom line too. Whatever tickles your fancy.
#6 Now we’ll get a little more technical. Look at arrow A. This is the bare bones. You can see it is made up of a rectangle and a triangle. Not particularly stunning. Now look at arrow B. It is filled in and looks better. Now look at arrow C. Wow. Quite exciting, n’est-ce pas? All I did was add some dots. In doodling, those details really add up.
#7 Here is a step-by-step on how to do those swirlies. I realized after I drew everything that my progression is tough to follow. B is under A; D is under C and E is at the bottom.
#8 A few ideas on doing a shape line. If you look at the end you can see how I make my stars. I do the 5-point thing that we learned in elementary school. Then I fill it in. Sometimes I fix the points if they are a bit off. But that’s it! Simple. You can surround the star with dots too.
#9 Another idea for a frame. Dots and dashes.
#10 And now we’re really getting wild and crazy. Semi circles on top of a line. Ohh! Now there are dots in the middle! And I switched to triangles. Added dots to the bottom and a mini circle on the top. Zany!
Hopefully, this tutorial has inspired you to experiment a bit with doodling! Good drawing! Next month will be wacky writing.
2 comments:
Awesome tutorial Beth! I have been wanting to try doodling, but haven't yet. I think I will now.
Beth,
I've always considered myself a master doodler. I doodle constantly! I'm going to try this!
Love ya!!!
Meredith
Post a Comment