First, I took the picture of the mayo outside, not because I was afraid of it entering the house, but because the light was the best there. However, I recently discovered an even better spot for pictures and am in the process of setting up a little studio much to T's dismay. (It is in our stair landing and is somewhat obtrusive.)
Second, dirt cups are made of chocolate mousse mixed with smashed Oreo cookies. Let me give you a short synopsis on what to do because they really are delish and kids (except for mine) seem to like them. What you do is make some instant chocolate pudding using a bit less milk than it calls for on the package. Let that set for a bit in the frigo. Then mix some cool whip in until it looks like mousse should. Mix in some smashed Oreos (if you want chunks). Put some smashed Oreos in the bottom of the cup, layer with your fake mousse and top with more smashed Oreos. Put some gummy worms on top for fun. Easy peasy. And now you have an indication of how I cook. Totally randomly. I prefer not to measure, I like to think that makes me a creative cook, but I think in reality it is more of a lazy thing.
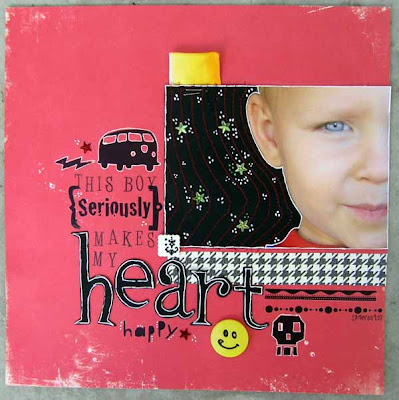
Third, Rachel asked me what I did to this picture on this layout so I thought that I'd do a little tutorial. It is a pretty simple technique.
 I took a picture of C with part of his face cut off and totally loved the look, but I hated the distracting background so I wanted to cover that up and make it blend more. I wanted a rock-and-roll boyish type look.
Ingredients:
fine-grit sandpaper
black acrylic paint
white paint pen
KI Memories stars
1. Using sandpaper, sand the parts of the picture that you want to cover. Be very careful around the face, but don't worry about being careful anywhere else, paint covers mucho mistakes. I took a big chunk off the corner, but no one can tell.
2. Wipe off the powder left over from the sanding and make sure that your picture is nice and clean.
3. Using a very small paintbrush around the face, paint sanded areas with black. Allow to dry completely.
4. Outline face and edges of picture with white paint pen.
5. Place stars randomly on picture and doodle dots.
Pretty easy, but cool effect.
Have a great weekend!

1 comment:
So, I think that "Easy Peasy" is my new favorite phrase! :)
We had so much fun today--thank you, thank you, thank you...I think I have been talking my husband's ear off and he's probably tired of hearing all about my fun morning! It was truly a pleasure...
Post a Comment