Welcome to my blog! What a feast for the eyes this My Little Shoebox Blog Hop has been! The design team is so talented. It has been an honor to be included among them this past year.
Even though I've thoroughly enjoyed my time working with My Little Shoebox, I decided not to renew my contract for another year. I would like to focus more on teaching, publishing and expanding my artistic repertoire. As you can imagine, each of these things requires an abundance of time and energy. I'm excited for all the opportunities that are waiting for me to seize!
I'd like to bid a fond farewell to a wonderful company with a few of my favorite projects. Love you MLS!
Without further ado...
(Cape Cod Moments appeared recently in Somerset Memories.)
Whew, you made it to the end of my photos! Congrats!
Now, if you'd like to be entered into my own personal giveaway, please leave a comment with your favorite color of MLS Sprinkle Glaze Alphas. I will randomly choose a winner on Monday and will do my bestest to send you your favorite color. Good luck!
Now on to the GRAND PRIZE! It is only a blog away! Hop on over to Pattie Beltran's blog.
Showing posts with label mini album. Show all posts
Friday, June 18, 2010
Tuesday, June 1, 2010
Happiness Album
Last month, the My Little Shoebox designers were given a Punky Sprouts mixed-media album to complete. I decided to make a Happiness Album filled with inspiring quotes to encourage me on grumpy days. (Of course, no one else has those kinds of days...)
I'm kinda a quote junkie so this was a great way to display all those lovely thoughts.
This is how it turned out...
The cover
The inside pages.
Once I finished, I sent some pictures to Punky Sprouts and they featured it on their blog. Yeah!
By the way, there are still a few spots left in my June 5th class so if you are thinking about signing up. You've still got a few hours! :)
Happy Creating!
xoxo
Bethany
I'm kinda a quote junkie so this was a great way to display all those lovely thoughts.
This is how it turned out...
The cover
The inside pages.
Once I finished, I sent some pictures to Punky Sprouts and they featured it on their blog. Yeah!
By the way, there are still a few spots left in my June 5th class so if you are thinking about signing up. You've still got a few hours! :)
Happy Creating!
xoxo
Bethany
Monday, January 18, 2010
Home Mini-Album
My home mini-album is really a project straight from my heart. When I was preparing for this project, I culled all my bins and drawers for images, stamps, colors and bits that made me think of HOME. It was really enlightening to see what ended up in my pile: birds, eggs, flowers, hearts, children, keys. All of my favorite things.
I got the idea for this album from an article in Cloth, Paper, Scissors magazine. I can't remember the artist's name, but it was a great article. (Almost every article in that magazine is great.)
The bones of this album are pieces of cardboard that I saved from Christmas gift packaging. I adhered a piece of paper cloth to the front and back of my house. (Before I adhered the paper cloth, I sewed on it.) I did a two-part video of how to make paper cloth here.
Here is a picture of the front.

A side view. The rings that I had on hand are too small. Hence the reason why my album is pretty wide. I really need to get bigger ones, but I haven't quite gotten to the store yet.

Ever since I was a little girl, I wanted to be a momma. I wanted to have a large, boisterous, energetic family and I do. It makes me happy. (And tired, too.)

In order to do the drips on the background, hold your cardboard vertically and spray your Shimmerz Spritz in Mudpie really close. Let it run and run.

I think that I use sequin waste on every single project. I love it so much.

A close-up of the tags.

On this page, I tested out some pastels and stamps that my sweet momma gave me for my birthday.

I used a lot of GCD Studio's Artsy Urban leftovers on this page.

I combined my own writing with stamped letters on this circle page. Love how it turned out.

This rose is a piece cut out of some lace that I had in my stash. I blinged it up with Shimmerz Blingz.

I adore everything about this page.

Isn't that image so precious? It is from Crafty Secrets.

This image is also made by Crafty Secrets.

The back cover.

This project may look very complex, but it is actually a series of very simple steps. It all starts with a coat of paint, some Shimmerz Spritz and some stamps. Very doable. Really. I promise. Would you be interested in learning how I did the backgrounds? I'm considering doing a video, if there is enough interest. Let me know.
Speaking of videos, if you liked my first videos, I am sure that you will be pleased to learn that I'm working on a few more. I'll be doing video reviews for The Scrap Review, some Basics videos for Shimmerz Paints as well as a few more just because. Be on the lookout!
Also, my CHA-W faves will be on The Scrap Review tomorrow afternoon. You'll get a peek into what I'll be playing with shortly!
Happy Creating!
xoxo
Bethany
I got the idea for this album from an article in Cloth, Paper, Scissors magazine. I can't remember the artist's name, but it was a great article. (Almost every article in that magazine is great.)
The bones of this album are pieces of cardboard that I saved from Christmas gift packaging. I adhered a piece of paper cloth to the front and back of my house. (Before I adhered the paper cloth, I sewed on it.) I did a two-part video of how to make paper cloth here.
Here is a picture of the front.

A side view. The rings that I had on hand are too small. Hence the reason why my album is pretty wide. I really need to get bigger ones, but I haven't quite gotten to the store yet.

Ever since I was a little girl, I wanted to be a momma. I wanted to have a large, boisterous, energetic family and I do. It makes me happy. (And tired, too.)

In order to do the drips on the background, hold your cardboard vertically and spray your Shimmerz Spritz in Mudpie really close. Let it run and run.

I think that I use sequin waste on every single project. I love it so much.

A close-up of the tags.

On this page, I tested out some pastels and stamps that my sweet momma gave me for my birthday.

I used a lot of GCD Studio's Artsy Urban leftovers on this page.

I combined my own writing with stamped letters on this circle page. Love how it turned out.

This rose is a piece cut out of some lace that I had in my stash. I blinged it up with Shimmerz Blingz.

I adore everything about this page.

Isn't that image so precious? It is from Crafty Secrets.

This image is also made by Crafty Secrets.

The back cover.

This project may look very complex, but it is actually a series of very simple steps. It all starts with a coat of paint, some Shimmerz Spritz and some stamps. Very doable. Really. I promise. Would you be interested in learning how I did the backgrounds? I'm considering doing a video, if there is enough interest. Let me know.
Speaking of videos, if you liked my first videos, I am sure that you will be pleased to learn that I'm working on a few more. I'll be doing video reviews for The Scrap Review, some Basics videos for Shimmerz Paints as well as a few more just because. Be on the lookout!
Also, my CHA-W faves will be on The Scrap Review tomorrow afternoon. You'll get a peek into what I'll be playing with shortly!
Happy Creating!
xoxo
Bethany
Monday, November 30, 2009
One Week Journal
The My Little Shoebox designers were given a personalized mini-album from Clear Scraps to alter about a month ago. Since my name is 7 letters long, I decided to do an art journal for a week. I chose a random week (November 1-7th) because I wanted a brief glimpse in my regular life.
This is how it turned out.

I began by painting (acrylic paints), misting (Shimmerz Spritz in Cotton Candy), and stamping (Inque Boutique) the background. I chose three colors: pink, yellow and baby blue along with white and black. This kept the project cohesive.

I adhered my My Little Shoebox chipboard letters and letter stickers next. A bit of outlining makes them pop.
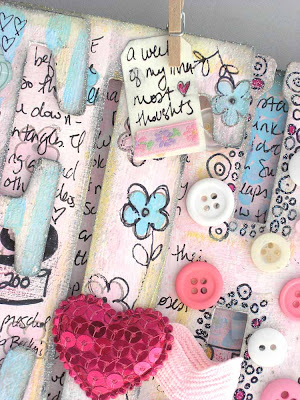
Then I cut out tons of images from My Little Shoebox papers and adhered them to the borders of my pages. I pretty much stuck with one theme per letter.

Then I embossed the edges of each letter with JudiKins sparkle silver embossing powder. This was a mistake. I should have embossed when I was all done writing. I went through pen after pen trying to write over stray embossing powder crystals. Darn it.


I tried to write something each day, but I got behind after day two. (Of course) I ended up writing a few days at a time, but I have a pretty good memory so I don't think that it really matters.

After I finished writing, I embellished like crazy. This, in my opinion was the best part. I added buttons, chipboard elements (Basic Grey), ribbon (Making Memories), rickrack, mini mosaic tiles (Harmonie).

I also added some bling with Shimmerz Blingz in Hi Ho Silver. Wow, that stuff is cool! (See the silver cloud around the date? That is Shimmerz.)

I love how My Little Shoebox papers have so many cool images to cut out! Here's one of my little scenes.

The mini mosaic tiles by Harmonie are another one of my favorite additions. They just add something extra.

I also did a few flowers using My Little Shoebox papers and some Shimmerz Spritz in Cotton Candy. (It may just be my favorite Spritz color.)

I also added some Hi Ho Silver Blingz to the flowers to give them even more sparkle.


This is my favorite date. I think it turned out absolutely perfectly. To make it, I painted a very small border around a Heidi Swapp butterfly mask using yellow. Then after I removed the mask, I painted a little blue border inside. I wrote the date then outlined with a pink colored pencil. The pink butterflies are made of acetate colored with alcohol ink and edged with Hi Ho Silver Blingz again. I can't get enough of that stuff!

I added some ribbons and some Melissa Frances tinsel to the rings to finish it all up.

This was a very time intensive project, but I absolutely love how it turned out!
Now for some less interesting personal stuff. (hehehe)
This weekend, the bigger girls, my friend Sara, and I went to my sister, Mandy's musical: Seven Brides for Seven Brothers. This was D and Z's first live performance (that they can remember) and they were completely enthralled. They were so bummed when the musical ended and asked me if we could go to every performance in the future. It was a lovely evening for us. I'm now looking into children's theater because both of them have serious interest especially Z. (No surprise for those of you who know her...) If you know of any good theaters in the Phoenix area, please let me know. I need some leads.
I just signed up for a cool paperclay class at Mystic Paper in Mesa, AZ. I can't tell you how excited I am. I've always wanted to work with paperclay and now I have the chance! There are still openings if you want to learn how to make this cute guy (look for the Polka Dot Pixie) and hang with me. I've only taken two other live classes (one on soldering and another by Tim Holtz) and each time I complete a class, I experience a major creative high. I love it.
I'm on ScrapScene again with a few Christmas cards. It is always a thrill to appear there!
If you haven't checked out The Next Step lately, you are seriously missing out. Jeanet Kuiper is our guest artist this month and she did a great tutorial on using scraps, paint and misting to make lovely backgrounds.
Oh, and Lucy Edson has a wonderful new video tutorial up on Shimmerz (I was just totally inspired to get misting on fabric after I watched it) and the My Little Shoebox blog has been updated with some fun projects including the DT scraplift results.
Have a wonderful week!
xoxo
Bethany
This is how it turned out.

I began by painting (acrylic paints), misting (Shimmerz Spritz in Cotton Candy), and stamping (Inque Boutique) the background. I chose three colors: pink, yellow and baby blue along with white and black. This kept the project cohesive.

I adhered my My Little Shoebox chipboard letters and letter stickers next. A bit of outlining makes them pop.

Then I cut out tons of images from My Little Shoebox papers and adhered them to the borders of my pages. I pretty much stuck with one theme per letter.

Then I embossed the edges of each letter with JudiKins sparkle silver embossing powder. This was a mistake. I should have embossed when I was all done writing. I went through pen after pen trying to write over stray embossing powder crystals. Darn it.


I tried to write something each day, but I got behind after day two. (Of course) I ended up writing a few days at a time, but I have a pretty good memory so I don't think that it really matters.

After I finished writing, I embellished like crazy. This, in my opinion was the best part. I added buttons, chipboard elements (Basic Grey), ribbon (Making Memories), rickrack, mini mosaic tiles (Harmonie).

I also added some bling with Shimmerz Blingz in Hi Ho Silver. Wow, that stuff is cool! (See the silver cloud around the date? That is Shimmerz.)

I love how My Little Shoebox papers have so many cool images to cut out! Here's one of my little scenes.

The mini mosaic tiles by Harmonie are another one of my favorite additions. They just add something extra.

I also did a few flowers using My Little Shoebox papers and some Shimmerz Spritz in Cotton Candy. (It may just be my favorite Spritz color.)

I also added some Hi Ho Silver Blingz to the flowers to give them even more sparkle.


This is my favorite date. I think it turned out absolutely perfectly. To make it, I painted a very small border around a Heidi Swapp butterfly mask using yellow. Then after I removed the mask, I painted a little blue border inside. I wrote the date then outlined with a pink colored pencil. The pink butterflies are made of acetate colored with alcohol ink and edged with Hi Ho Silver Blingz again. I can't get enough of that stuff!

I added some ribbons and some Melissa Frances tinsel to the rings to finish it all up.

This was a very time intensive project, but I absolutely love how it turned out!
Now for some less interesting personal stuff. (hehehe)
This weekend, the bigger girls, my friend Sara, and I went to my sister, Mandy's musical: Seven Brides for Seven Brothers. This was D and Z's first live performance (that they can remember) and they were completely enthralled. They were so bummed when the musical ended and asked me if we could go to every performance in the future. It was a lovely evening for us. I'm now looking into children's theater because both of them have serious interest especially Z. (No surprise for those of you who know her...) If you know of any good theaters in the Phoenix area, please let me know. I need some leads.
I just signed up for a cool paperclay class at Mystic Paper in Mesa, AZ. I can't tell you how excited I am. I've always wanted to work with paperclay and now I have the chance! There are still openings if you want to learn how to make this cute guy (look for the Polka Dot Pixie) and hang with me. I've only taken two other live classes (one on soldering and another by Tim Holtz) and each time I complete a class, I experience a major creative high. I love it.
I'm on ScrapScene again with a few Christmas cards. It is always a thrill to appear there!
If you haven't checked out The Next Step lately, you are seriously missing out. Jeanet Kuiper is our guest artist this month and she did a great tutorial on using scraps, paint and misting to make lovely backgrounds.
Oh, and Lucy Edson has a wonderful new video tutorial up on Shimmerz (I was just totally inspired to get misting on fabric after I watched it) and the My Little Shoebox blog has been updated with some fun projects including the DT scraplift results.
Have a wonderful week!
xoxo
Bethany
Labels:
altered projects,
mini album,
My Little Shoebox,
Shimmerz
Subscribe to:
Posts (Atom)


