Day Two: Sketching
Now that you have your topic, I want you to sketch out what you want to say. Take a few minutes of peaceful time and write a few notes about your subject. You don’t need to write in complete sentences, I just want you to start focusing your thoughts. Here are a few questions to help you with this.
Is the date and time important?
Who and what is involved?
Is this an ongoing thing? Or did this happen only a few times?
What lessons did you learn from this?
How has your life changed because of this? (For better or for worse)
If your subject relates directly to a photo, write down the significance of this photo.
Is there a deeper meaning to this photo? For example, if it is of your great-grandmother reading, and she didn’t learn to read until she was 45, could you talk about how knowledge opened up doors for her? Or how you are grateful that she was a pioneer of education in your grandmother’s life? Etc.
Is the photo significant because there is something missing that is normally present?
Did you learn something the hard way?
Did someone give you advice, ask a question, say something that completely changed your outlook?
I want you to get as raw as you can. No one has to see this, if you don’t want them to. Remember, if you don’t have great passion for this subject, you won’t be able to evoke passion in others so if this is hard, perhaps you need to switch topics.

Saturday, January 31, 2009
Friday, January 30, 2009
The Soul of our Art: Day 1
I wrote this tutorial on Heartfelt Journaling ages ago. It's high time I posted here.
Good design and beautiful color combinations are eye-candy; they immediately capture our attention. However, if you really want to move someone, journaling is the tool. Over the next 5 days, I’m to focus on the soul of our art: the words.
Your assignment for day one is to choose a topic. Remember this must be an emotional topic that really moves you. We’re going to be working on this for five days so you want something that won’t pitter away after day two. This subject must have passion in order to give your page soul.
Good design and beautiful color combinations are eye-candy; they immediately capture our attention. However, if you really want to move someone, journaling is the tool. Over the next 5 days, I’m to focus on the soul of our art: the words.
Day One: Choosing
Today, you need to decide on your subject. I want you to choose an emotional subject. (We’re going to work on really digging deep.) You can do this in a few ways.
- Do you have a photo that has great significance? Go unearth it and study it. Figure out exactly what makes this photo special. Is it your only photo of your grandfather before he died? Does it show a certain personality trait in your son? Does it show the result of hard work?
- Do you have an experience with great significance? If you do not have a photo from this experience, don’t fret. Just find a photo that ties loosely with what you want to say. For example, if you want to talk about your struggle with weight, you don’t need Before and After photos, you could use a photo of food, of your face, of clothing, of a restaurant, etc.
- Do you have a feeling or thought that you want to express? For example, do you feel so overwhelmed by your life that you need an emotional purge? Do you feel a desire to express a life-altering thought that you’ve had recently?
Your assignment for day one is to choose a topic. Remember this must be an emotional topic that really moves you. We’re going to be working on this for five days so you want something that won’t pitter away after day two. This subject must have passion in order to give your page soul.
Thursday, January 29, 2009
Bucket Heads
What is it about little boys and buckets? I remember very vividly my own brothers putting buckets on their heads while swinging. They pretended they were motorcycle helmets and the swings were their motorcycles.
At least they were practicing safety.
Cam and his friend J, were discovered a few weeks ago sporting these lovely flowerpots...
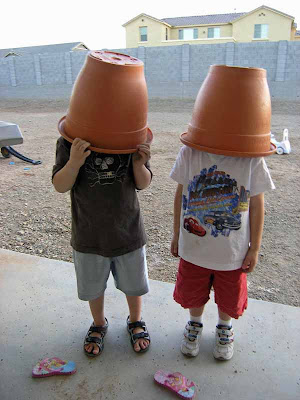
None of my girls do things like this.
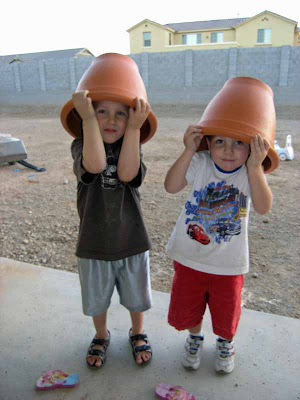
Little boys are just so much fun. I just love them!
At least they were practicing safety.
Cam and his friend J, were discovered a few weeks ago sporting these lovely flowerpots...

None of my girls do things like this.

Little boys are just so much fun. I just love them!
Wednesday, January 28, 2009
Got Sketch? Guest
I was asked last week to guest on the Got Sketch? blog. I've always enjoyed working with sketches so this was a fun challenge.
I took pictures of my mom with each of the kids in November so I thought that I'd do a special page for each of them. This is Danika's page (you saw Zo's yesterday).

Here's a closeup of the flower vine. I used three different pattern papers to make it. Loads of fussy cutting, but I like how it turned out.

I have another closeup of the title because I wanted to show how I placed pattern paper in the spaces of the letters. It adds another touch of orange to balance out the flower vine on the right.
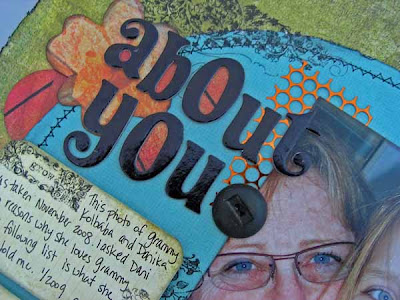
Journaling: This photo of Grammy Kolbaba and Danika was taken November 2008. I asked Dani for 10 reasons why she loves Grammy and the following list is what she told me. 1. She's loving 2. She's sweet 3. My name is Grammy (an inside joke between the two of them) 4. When she stays with us 5. Doing fun things 6. Telling sotires about when she was a girl 7. Presents 8. Cheering me up 9. Playing games 10. Reading books with me.
Materials: Pattern Paper: Basic Grey and My Mind's Eye; American Crafts pens and letters; Vintage buttons and lace; Karen Foster jewel brad; Prima rubons; unknown manufacturer of journaling cards; sequin waste
Tuesday, January 27, 2009
Faking the Watercolors
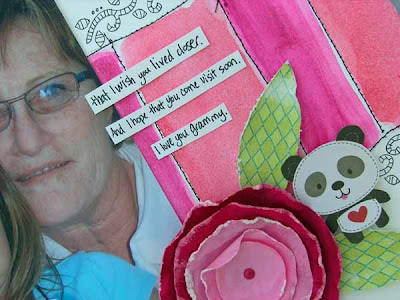
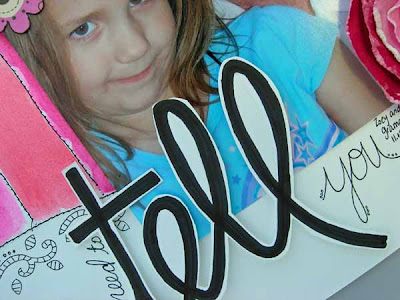
I was so excited the day that I discovered that I could use acrylic paints and water to fake the look of watercolors! Here's a layout where I implemented this cool technique.
I made this for the Prima-Build-A-Page January Contest. They just came out with the coolest new papers and I really really want to win some. (Actually, all of their new stuff is really cool. I'm going to have to win a lot of contests to satisfy my Prima obsession!)
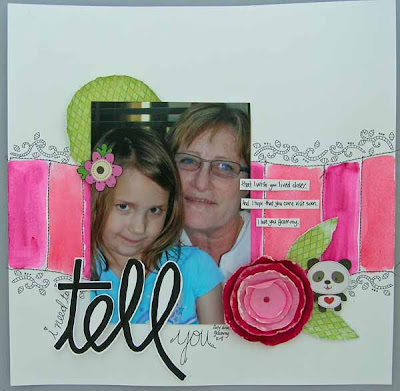
Journaling: I need to tell you that I wish you lived closer and I hope that you come visit soon. I love you Grammy. (Zoey told me that's what she wanted to tell her Grammy.)
Cardstock is Bazzil, paints are MM and I used American Crafts pens, everything else is Prima
Here are a few close-ups. I stitched the borders of the paint areas to give the layout more texture.
I wrote the title by hand.
In order to make those doodles, I used the packaging on that big Prima flower as a template.
Since I know that you're dying to try this at home, let me tell you exactly what I did.
1. Load your brush. The more paint you add, the more color you'll have. If you want a little color (like a subtle wash) just put a dab of paint on.
2. Dip your loaded brush into a cup of water.
3. Paint on your paper. Add more water if you need to spread your color more. Add more paint if you need more color.
That's it! It is so easy! I'm totally loving the results too!
Have fun! If you make something using this technique, please leave a comment so I can see it!
I made this for the Prima-Build-A-Page January Contest. They just came out with the coolest new papers and I really really want to win some. (Actually, all of their new stuff is really cool. I'm going to have to win a lot of contests to satisfy my Prima obsession!)

Journaling: I need to tell you that I wish you lived closer and I hope that you come visit soon. I love you Grammy. (Zoey told me that's what she wanted to tell her Grammy.)
Cardstock is Bazzil, paints are MM and I used American Crafts pens, everything else is Prima
Here are a few close-ups. I stitched the borders of the paint areas to give the layout more texture.

I wrote the title by hand.

In order to make those doodles, I used the packaging on that big Prima flower as a template.
Since I know that you're dying to try this at home, let me tell you exactly what I did.
1. Load your brush. The more paint you add, the more color you'll have. If you want a little color (like a subtle wash) just put a dab of paint on.
2. Dip your loaded brush into a cup of water.
3. Paint on your paper. Add more water if you need to spread your color more. Add more paint if you need more color.
That's it! It is so easy! I'm totally loving the results too!
Have fun! If you make something using this technique, please leave a comment so I can see it!
Monday, January 26, 2009
Pretty Pieces of my Life
Sometimes I am overcome with all the beauty around me. I am so very blessed.
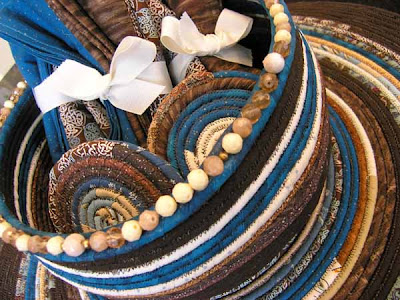
My mom sent me this wonderful fabric bowl, pot holders, napkins and coasters for Christmas. She made them in my downstairs color scheme and I'm thrilled to be the lucky recipient of such a thoughtful gift. Aren't they gorgeous? Thank you Momma! (Yeah, she pretty much taught me everything I know about crafting stuff.)
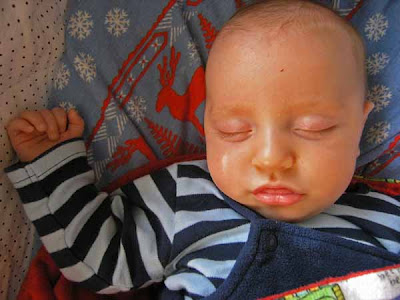
And this little man makes me smile every day. I snapped this picture while he was sleep-nursing. You can see his little tongue taking in every last drop of dream-milk.
Tomorrow, I go to the doctor about my screwy knee. You can read about the tragic incident here. After three weeks, I'm still gimping around. I think that my limp is quite jaunty, but friends and relatives have told me otherwise...
I'm a little scared, but ready to move on and figure out what to do to fix this problem. So please be thinking positive knee thoughts tomorrow around, oh, 10ish.
My mom sent me this wonderful fabric bowl, pot holders, napkins and coasters for Christmas. She made them in my downstairs color scheme and I'm thrilled to be the lucky recipient of such a thoughtful gift. Aren't they gorgeous? Thank you Momma! (Yeah, she pretty much taught me everything I know about crafting stuff.)

And this little man makes me smile every day. I snapped this picture while he was sleep-nursing. You can see his little tongue taking in every last drop of dream-milk.

Tomorrow, I go to the doctor about my screwy knee. You can read about the tragic incident here. After three weeks, I'm still gimping around. I think that my limp is quite jaunty, but friends and relatives have told me otherwise...
I'm a little scared, but ready to move on and figure out what to do to fix this problem. So please be thinking positive knee thoughts tomorrow around, oh, 10ish.
Friday, January 23, 2009
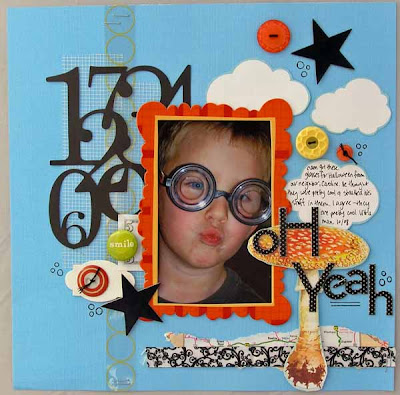
Oh Yeah
Do you remember these glasses? The kids got them for Halloween.
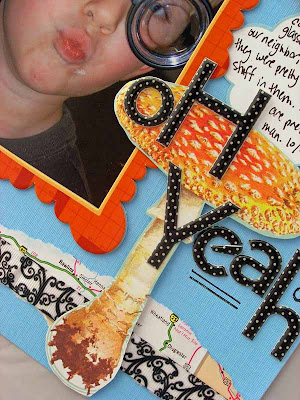
Here's a closeup.
Materials: Luxe ribbon, American Crafts letters and pattern paper; KI Memories number lace; dry wall tape; Hambly transparency, DCWV cardstock; map; mushroom purchased at Paper Studio (don't know manufacturer); Heidi Swapp star; Paper Studio buttons; embroidery floss; Love Elsie frame
Totally love this layout. It was just a blast to make!
I'm still updating my gallery and resume so I've been pretty busy. I'll be back in full swing next week though!

Here's a closeup.

Materials: Luxe ribbon, American Crafts letters and pattern paper; KI Memories number lace; dry wall tape; Hambly transparency, DCWV cardstock; map; mushroom purchased at Paper Studio (don't know manufacturer); Heidi Swapp star; Paper Studio buttons; embroidery floss; Love Elsie frame
Totally love this layout. It was just a blast to make!
I'm still updating my gallery and resume so I've been pretty busy. I'll be back in full swing next week though!
Tuesday, January 20, 2009
Pardon My Dust
I'm working on updating my Art Resume (making it more viewer-friendly) and on improving my blog. So, if you see a lot of random stuff in the next few weeks (i.e. loads of tutorials) that is why.
I should be done in a few days.
In the meantime, check out Luxe's new Lovey line! So pretty!
I should be done in a few days.
In the meantime, check out Luxe's new Lovey line! So pretty!
Thinking Outside the Box
I did this article a few months ago and never posted here.
Just because most scrapbook paper comes in a 12x12 size, doesn’t mean that we have to limit ourselves to a 12x12 square. Lately, I’ve been experimenting with borders and I’ve had so much fun doing so. Some easy ways of breaking the 12x12 limit are to cut your paper into a large circle. (A large dinner plate works great as a template.) Or what about cutting your paper into another shape like a heart? Or a star? You can also cut your background paper down to a smaller size and extend your page using various shapes like I did in Bluebell.
If you want to do something a bit more conservative, you can easily add scallops to your edges by using a small circle punch and adhering the punched circles to the border of your pages. Like I did here.

On Remember You’re Amazing, I did this on a bigger scale using a quilt as inspiration.
If you worry about fitting your page into a page protector, as I do, simply lay an unused sheet of 12x12 cardstock behind your workspace and make sure that you don’t put anything on your page that extends past that piece of cardstock.
The possibilities are endless when you don’t limit yourself! Happy creating!
Monday, January 19, 2009
Paper Towel Painting
I wrote this article last month and thought I'd share it here.
Paper towels are not just for wiping up spills and cleaning windows, you can also use them in your art! I love how they are flexible like fabric and still can be torn like paper. They are the perfect blend of these two mediums. I love to use them as a background on my ATC (Artist Trading Cards) or scrapbook pages. For this project, I was inspired by the little girls on some Graphic 45 tags. I found their sweet faces intriguing and wondered about their personalities. I decided to do a few ATCs that shed a little light on the girls' lives. This is a quick and creatively stimulating project. Cut loose and have fun with it!
I apologize for the small size of the pictures!
For this project you will need the following supplies:
Your favorite tags from a Graphic 45 die-cut tag sheet and Jenni Bowlin stickers, a few vintage buttons, a few flowers, paint, glaze, stamps, black or brown StazOn ink, cardstock in any color, text from an old book
Tools: Paintbrush, wet adhesive, sewing machine and thread, black or brown ink pad
- Conservatively wet your paper towel. It should be barely wet. Spread it out on your work surface.
- Conservatively dip your brush into your first paint color and “clean” the brush on the wet paper towel. You are basically dry-brushing paint. Do not load up your brush too much. Repeat using all your paint colors. Try not to mix them as this will muddy the colors.
- Crumple up your paper towel so that the colors can blend.
- Spread out your paper towel and add more paint if necessary. If you like the look, drip a few drops of glaze on the paper towel. Crumple again.
- When you like the look, let your paper towel dry. If you are in a hurry, like I usually am, you can use your heat tool.
- Cut your cardstock into a 2½ x 3 ½ inch rectangle. Cut the images out of your tags.
- Find words that you would like to use on your ATC. I took one page of text and hunted for words that were interesting. Don’t limit yourself to the sentences on your page, make your own. Ink the edges of your text blocks if you wish.
- Adhere your dry paper towel to your cardstock using a wet adhesive. I used gel medium, but PVA would work too. Trim off excess.
- If you desire, sew around the edges of the ATC. Ink the edges
- Now comes the most fun part! Using StazOn ink, stamp right on the paper towel. Adhere your images, flowers, buttons, and text in a way that is pleasing to you.
- Take pictures of your finished project and leave me a comment with a link. I'd love to see your creations!
Sunshine in my Heart
I completed this wall-hanging a little bit ago and thought I'd share with you.
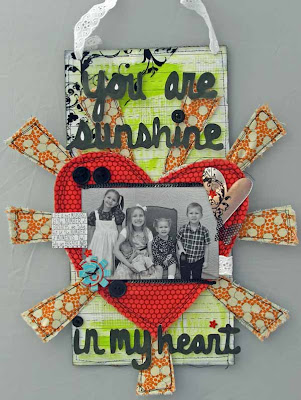 The base is cardboard from some packaging, the background paper is Luxe, the fabric is from a swap (thanks Katy!) and the lettering is my own design.

I wrote out the letters using a black marker on white paper and cut them out. I adhered them using pop dots to give the entire piece more dimension.

Materials: Heidi Swapp mirror and transparent objects, pattern paper: Luxe; KI Memories bling flowers; unknown sequins, MM lace and paint; Prima blue flower; Fontwerks stamp.
The kids have the day off today so we've been having fun playing with the new markers that Grammy sent for Christmas and visiting with friends at the park. Some of the markers are scented so we've been sniffing them all morning. I think all markers should smell like flowers and various fruits and chocolate. All of us have colored dots on the underside of our noses. It is pretty cute on the kids, but I think I'd better wash up before someone sees me. I love vacation days!
Later this afternoon I'll work on my guest design projects and this evening will be a celebration for my brother, Dane, who recently finished all of his undergrad classes. Congratulations! D and I made a chocolate cake for him. She is an expert egg-cracker and I'm pretty good at mixing so between the two of us, we had it all covered. I'm mulling over decorating options right now. I'm thinking chocolate frosting with swirls. Unfortunately, I'm out of chocolate chips so I can't grind them up and sprinkle them on the top of the cake. (That's my signature move on mousse.) If the cake turns out well, I'll share pics of it with you, if not, well, it will still taste delish.
 The base is cardboard from some packaging, the background paper is Luxe, the fabric is from a swap (thanks Katy!) and the lettering is my own design.
I wrote out the letters using a black marker on white paper and cut them out. I adhered them using pop dots to give the entire piece more dimension.

Materials: Heidi Swapp mirror and transparent objects, pattern paper: Luxe; KI Memories bling flowers; unknown sequins, MM lace and paint; Prima blue flower; Fontwerks stamp.
The kids have the day off today so we've been having fun playing with the new markers that Grammy sent for Christmas and visiting with friends at the park. Some of the markers are scented so we've been sniffing them all morning. I think all markers should smell like flowers and various fruits and chocolate. All of us have colored dots on the underside of our noses. It is pretty cute on the kids, but I think I'd better wash up before someone sees me. I love vacation days!
Later this afternoon I'll work on my guest design projects and this evening will be a celebration for my brother, Dane, who recently finished all of his undergrad classes. Congratulations! D and I made a chocolate cake for him. She is an expert egg-cracker and I'm pretty good at mixing so between the two of us, we had it all covered. I'm mulling over decorating options right now. I'm thinking chocolate frosting with swirls. Unfortunately, I'm out of chocolate chips so I can't grind them up and sprinkle them on the top of the cake. (That's my signature move on mousse.) If the cake turns out well, I'll share pics of it with you, if not, well, it will still taste delish.
Sunday, January 18, 2009
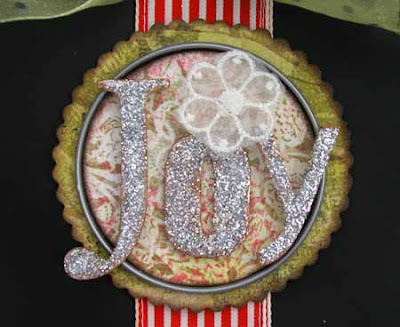
Christmas Joy, Hope and Peace
I did this tutorial in December and wanted to post it on my blog. I know that it is a little late (or too early) for Christmas projects, but you can apply the ideas to any holiday. I hope that you enjoy!
For some reason some of the pictures grew in size as I uploaded them. I'm sorry about that!
Christmas is a special time of year when JOY, HOPE and PEACE reign. Join with me as we celebrate these wonderful feelings by making a simple wall-hanging using the metal lids from concentrated orange juice containers. This project is not only beautiful, but also symbolic.
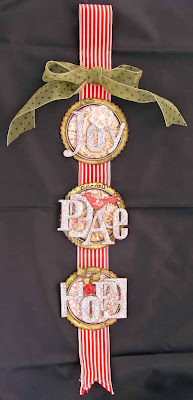
With JOY blooms a beautiful white flower.
With HOPE grows holly, one of the only green plants that thrive in the snow.

And PEACE is accompanied by none other than a dove.

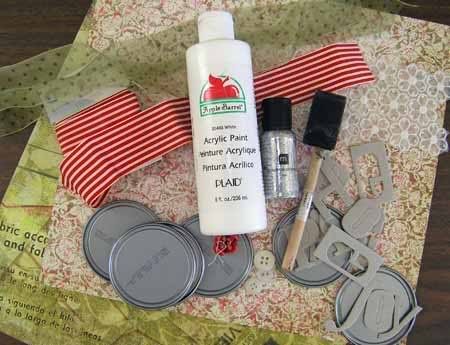
Supply List :
2 12x12 sheets of coordinating pattern paper in Christmas colors
(You will not use the entire sheet)
1 yard of 1½-inch wide ribbon (I used a red and white stripe)
1 yard of 1½-inch wide ribbon (I used a green polka dot)
3 metal concentrated orange juice tops
(They measure a little over 2½-inches in diameter)
1 bottle loose silver glitter (I used Making Memories)
White acrylic paint
1 red vintage button
1 white (about ½ inch wide) flower (I used one from a piece of vintage lace)
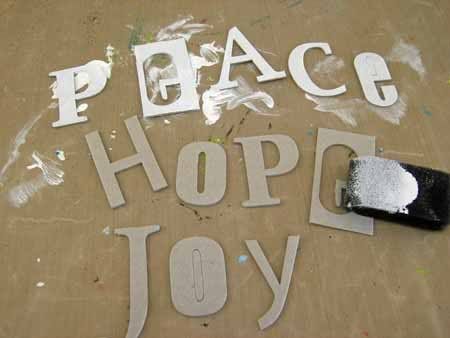
Chipboard letters that spell out JOY, PEACE, HOPE (I used Heidi Swapp)
A small bird stamp (about 1 inch long) (I used an Autumn Leaves stamp)
Silver Stickles
3D foam squares (You will be cutting these down)
Red Ink (to stamp your bird)
Brown or Black ink for inking edges of papers (I used Colorbox cat’s eye)
Warning: You will get glitter on your black or brown ink pad. I have not had any adverse effects from this other than a blingy ink pad. If you do not want glitter on your pad, use a piece of craft foam dipped in a dye ink pad like Ranger Distress pads.
Tools
Foam paintbrush
Elmer’s school glue
Tacky glue (a stronger hold than Elmer’s)
Scallop scissors
Regular scissors
1 file folder (to catch stray glitter and pour it back into your bottle)
Sewing machine and white thread (optional)
Fabric glue if you don’t want to use a sewing machine (Test this on a small piece of ribbon to make sure that it doesn’t show through.)
Class Instructions :
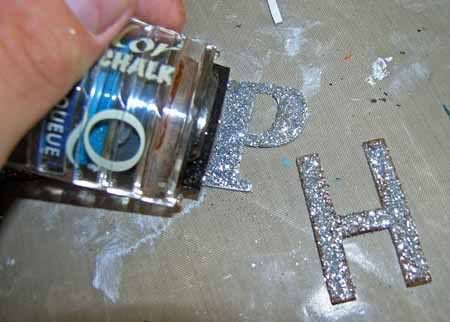
1. Paint the chipboard letters white using acrylic paint and a foam brush. Allow to dry.
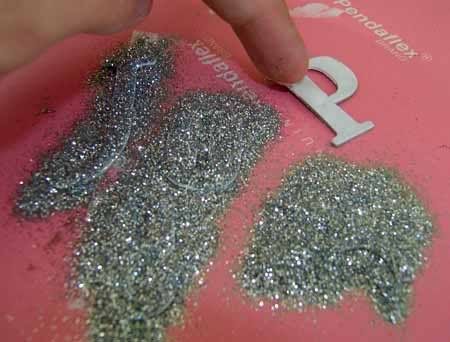
2. Use your finger to spread the Elmer’s glue on the front of each letter. Keep it neat, you don’t want to have blobs coming off of your letters, but use ample glue to adhere the glitter.
TIP: Have a baby wipe handy to clean off your finger as necessary when the phone rings.
3. Place gluey letters on your file folder and pour glitter on top. Allow letters to dry thoroughly. Overnight is best for impatient scrappers.
TIP: Allow the letters to dry for about 10 minutes before moving them. This will prevent you from removing glitter from the edges of the letters. I glued and glittered my letters in batches. When you have finished glittering, pour the glitter back into its bottle using the folder’s fold as a pour spout.
Apply extra glitter to your face and hair so you can look fancy all day long!
4. Choose which pattern paper you would like inside your metal lids and cut it to fit inside the circle. (On the lids, the side with the rim will be on top.)
TIP: When cutting circles, it is best to use small scissors and very small cuts. This will keep the circle rounded.
5. Using the other pattern paper, cut circles that are about ½ inch bigger than the circles that fit inside the metal lids. Use your scallop scissors to make the edges fancy.
6. Ink the edges of your papers using brown or black ink. (I used brown.)

7. Ink the edges of your glittered and dry letters using the same color ink. WARNING: You will get glitter on this ink pad. I have not had any adverse effects from this other than a blingy ink pad. If you do not want glitter on your pad, use a piece of craft foam dipped in a dye ink pad like Ranger Distress pads.
8. Adhere the inner circle to the metal lid using Elmer’s glue. Smooth out any bubbles. Allow to dry.
9. Adhere the outer circle to the back of the metal lid using Elmer’s glue. Smooth out any bubbles. Allow to dry.
10. Decide how long you would like your wall-hanging to be. Before you cut your ribbon, double that length. Fold the ribbon in half so that the two cut edges are together.
Cut the bottom of the ribbon into a V.
The easiest way to do this is to fold the ribbon lengthwise and make a diagonal cut from the outside of the ribbon to the inside fold. Meaning, the bottom of your scissors should be on the edge of the ribbon and the tip of your scissors should be at the fold. See the picture for clarification.
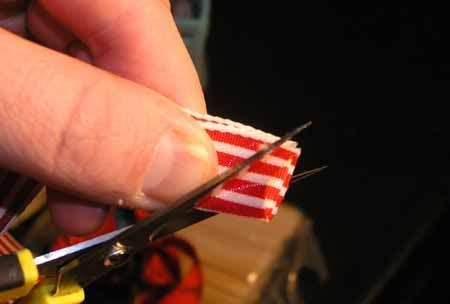
When you have made your cut, the bottom of your ribbon should look like this.

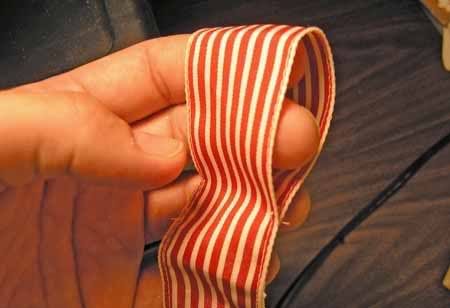
11. Sew the edges of the ribbon together (or glue together). This gives the ribbon more stability to hold those heavy metal lids.
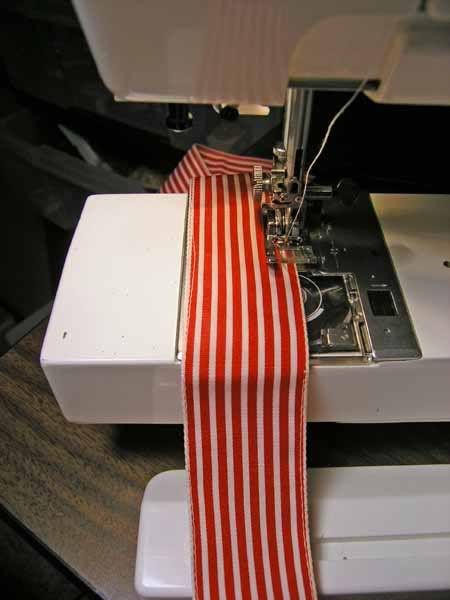
Make sure that you leave an open pocket at the top of the ribbon where the fold lies. This will be used to hang your final piece.
12. Place your letters in a way that is pleasing to you to the front of the metal lid.

Use 3D foam squares to layer them. On some letters, I used 2 pieces of foam on top of each other to get it even higher. On other letters, I simply adhered them using Elmer’s glue.
You can see how each letter is stacked when you look at HOPE on the side.

13. Embellish each circle as you desire. Freehand holly leaves and cut them out of your pattern paper. Ink the edges and adhere to HOPE along with your red button, use your white flower on JOY and stamp your bird for PEACE. I stamped the bird with red ink on white cardstock, cut it out, inked the edges, applied silver Stickles to various parts and adhered.

14. Adhere each metal circle to the ribbon using tacky glue. Tie a bow using your second ribbon. Adhere using tacky glue. Allow to dry.
TIP: You may need to apply weight to your ribbon bow to make sure that it says in place while drying.

15. Enjoy your creation!
Other Creative Options
Spell out different words like HAPPY, LOVE, etc.
Spell out one word with larger chipboard letters (MERRY, JOY, etc)
Use a different color glitter on your letters.
Instead of pattern paper, use pictures in each metal circle. You can also add embellies to your pictures and pour diamond glaze over the whole thing.
Use non-traditional Christmas colors like aqua and silver, green and gold, or red and pink.
Go funky instead of vintage.
For some reason some of the pictures grew in size as I uploaded them. I'm sorry about that!
Christmas is a special time of year when JOY, HOPE and PEACE reign. Join with me as we celebrate these wonderful feelings by making a simple wall-hanging using the metal lids from concentrated orange juice containers. This project is not only beautiful, but also symbolic.

With JOY blooms a beautiful white flower.

With HOPE grows holly, one of the only green plants that thrive in the snow.

And PEACE is accompanied by none other than a dove.

Supply List :
2 12x12 sheets of coordinating pattern paper in Christmas colors
(You will not use the entire sheet)
1 yard of 1½-inch wide ribbon (I used a red and white stripe)
1 yard of 1½-inch wide ribbon (I used a green polka dot)
3 metal concentrated orange juice tops
(They measure a little over 2½-inches in diameter)
1 bottle loose silver glitter (I used Making Memories)
White acrylic paint
1 red vintage button
1 white (about ½ inch wide) flower (I used one from a piece of vintage lace)
Chipboard letters that spell out JOY, PEACE, HOPE (I used Heidi Swapp)
A small bird stamp (about 1 inch long) (I used an Autumn Leaves stamp)
Silver Stickles
3D foam squares (You will be cutting these down)
Red Ink (to stamp your bird)
Brown or Black ink for inking edges of papers (I used Colorbox cat’s eye)
Warning: You will get glitter on your black or brown ink pad. I have not had any adverse effects from this other than a blingy ink pad. If you do not want glitter on your pad, use a piece of craft foam dipped in a dye ink pad like Ranger Distress pads.
Tools
Foam paintbrush
Elmer’s school glue
Tacky glue (a stronger hold than Elmer’s)
Scallop scissors
Regular scissors
1 file folder (to catch stray glitter and pour it back into your bottle)
Sewing machine and white thread (optional)
Fabric glue if you don’t want to use a sewing machine (Test this on a small piece of ribbon to make sure that it doesn’t show through.)
Class Instructions :
1. Paint the chipboard letters white using acrylic paint and a foam brush. Allow to dry.
2. Use your finger to spread the Elmer’s glue on the front of each letter. Keep it neat, you don’t want to have blobs coming off of your letters, but use ample glue to adhere the glitter.
TIP: Have a baby wipe handy to clean off your finger as necessary when the phone rings.
3. Place gluey letters on your file folder and pour glitter on top. Allow letters to dry thoroughly. Overnight is best for impatient scrappers.
TIP: Allow the letters to dry for about 10 minutes before moving them. This will prevent you from removing glitter from the edges of the letters. I glued and glittered my letters in batches. When you have finished glittering, pour the glitter back into its bottle using the folder’s fold as a pour spout.
Apply extra glitter to your face and hair so you can look fancy all day long!
4. Choose which pattern paper you would like inside your metal lids and cut it to fit inside the circle. (On the lids, the side with the rim will be on top.)
TIP: When cutting circles, it is best to use small scissors and very small cuts. This will keep the circle rounded.
5. Using the other pattern paper, cut circles that are about ½ inch bigger than the circles that fit inside the metal lids. Use your scallop scissors to make the edges fancy.
6. Ink the edges of your papers using brown or black ink. (I used brown.)
7. Ink the edges of your glittered and dry letters using the same color ink. WARNING: You will get glitter on this ink pad. I have not had any adverse effects from this other than a blingy ink pad. If you do not want glitter on your pad, use a piece of craft foam dipped in a dye ink pad like Ranger Distress pads.
8. Adhere the inner circle to the metal lid using Elmer’s glue. Smooth out any bubbles. Allow to dry.
9. Adhere the outer circle to the back of the metal lid using Elmer’s glue. Smooth out any bubbles. Allow to dry.
10. Decide how long you would like your wall-hanging to be. Before you cut your ribbon, double that length. Fold the ribbon in half so that the two cut edges are together.
Cut the bottom of the ribbon into a V.
The easiest way to do this is to fold the ribbon lengthwise and make a diagonal cut from the outside of the ribbon to the inside fold. Meaning, the bottom of your scissors should be on the edge of the ribbon and the tip of your scissors should be at the fold. See the picture for clarification.
When you have made your cut, the bottom of your ribbon should look like this.
11. Sew the edges of the ribbon together (or glue together). This gives the ribbon more stability to hold those heavy metal lids.
Make sure that you leave an open pocket at the top of the ribbon where the fold lies. This will be used to hang your final piece.
12. Place your letters in a way that is pleasing to you to the front of the metal lid.
Use 3D foam squares to layer them. On some letters, I used 2 pieces of foam on top of each other to get it even higher. On other letters, I simply adhered them using Elmer’s glue.
You can see how each letter is stacked when you look at HOPE on the side.
13. Embellish each circle as you desire. Freehand holly leaves and cut them out of your pattern paper. Ink the edges and adhere to HOPE along with your red button, use your white flower on JOY and stamp your bird for PEACE. I stamped the bird with red ink on white cardstock, cut it out, inked the edges, applied silver Stickles to various parts and adhered.
14. Adhere each metal circle to the ribbon using tacky glue. Tie a bow using your second ribbon. Adhere using tacky glue. Allow to dry.
TIP: You may need to apply weight to your ribbon bow to make sure that it says in place while drying.

15. Enjoy your creation!
Other Creative Options
Spell out different words like HAPPY, LOVE, etc.
Spell out one word with larger chipboard letters (MERRY, JOY, etc)
Use a different color glitter on your letters.
Instead of pattern paper, use pictures in each metal circle. You can also add embellies to your pictures and pour diamond glaze over the whole thing.
Use non-traditional Christmas colors like aqua and silver, green and gold, or red and pink.
Go funky instead of vintage.
Saturday, January 17, 2009
Rub-Ons Tutorial
Rub-ons are a wonderfully versatile product that come in a myriad of colors and styles. From alphabets to paint drops to images, you are sure to find a rub-on to suit your project.
First, a bit on rub-on transfer. I like to cut out the image that I want to use while keeping the protective sheet in place. This prevents any stray pieces from getting onto my project. Once you have your image, remove the protective sheet and place the transfer side down on your surface. Using the enclosed Popsicle stick, rub the back of the image to transfer it. You can carefully check to verify adhesion by lifting a corner of the backing sheet. Keep rubbing firmly (but not too firmly!) until the entire image has transferred. Voila! Rub-on basics.
In Zo Attitude, Attitude is written using MM rub-ons.

Journaling: When you’ve got it, flaunt it. 10.07
Cardstock: Bazzil
Pattern paper: Colorbok
Stickers: KI Memories borders, softies
Ink: Ranger black soot
Pens: zig, micron
Buttons: KI Memories softies
Ribbon: KI Memories
Rub-ons: MM alphabet
Other: Tim Holtz grungeboard alphabet; acrylic paint, KI Memories sparkle brads; MM brads, unknown sparkle flowers; Prima flowers; Stickles
In Das Happy, all the white "paint" is Basic Grey rub-ons.

Journaling: When Cameron saw this picture of himself he proudly stated: Das Happy.
Pattern paper: Luxe
Stamps: Sassafrass Lass
Stickers: Scenic Route, Fontwerks journaling stickers, unknown alpha stickers manufacturer
Ink: Ranger black soot; StazOn red
Pens: Faber-Castell
Buttons: KI Memories, All Dressed Up, Joanns
Ribbon: unknown manufacturers
Rub-ons: Basic Grey
Other: paper clips: KI Memories; Vinyl shapes unknown manufacturer; staples
Rub-ons can be applied to basically any surface that is clean and free of oils and dust. I’ve applied rub-ons to paper, photos, candles, and buttons. I’ve also seen rub-ons applied to glass and cell phones. Basically, the possibilities are endless.Here are a few examples of rub-ons being used in unexpected places.
Like on buttons in these detail shots.


Here, I used a dare to rub-on on a piece of pattern paper to make my own sentence.

And here's a rub-on applied to a candle. This was a bit tricky since I had to press pretty hard without smooshing the wax. And you can see that I wasn't very good at it in the beginning. However, it is a great idea for a little gift.

Now, let’s get a bit more artistic. I like to combine rub-ons with paint. For Water Bottle Obsession, I applied the flower rub-ons and dry brushed white paint inside. When you dry brush, do not load your brush with a lot of paint, be sparing, this will allow you to apply a transparent layer onto your project. You can see that I wasn’t too careful. I applied the paint directly over the rub-on, but because it was such a small amount of paint, you can still see the outline of the flower.

Journaling: Lyssie just loves to play with water bottles! 10.07
Techniques: painting with rub-ons, painting flowers, doodling with rub-ons
Cardstock: Bazzil
Pattern paper: MOD
Stickers: American Crafts thickers alphabet
Pens: micron, zig
Rub-ons: MaisyMo flowers
Other: Heidi Swapp large flower; Prima small flowers; acrylic paint; KI Memories brads

Journaling: I was so nervous that I almost didn’t go. At the last minute I decided to run my 1st 5K. 31 min 21 sec. Not bad. I guess I was so busy I forgot I’m an athlete.
Techniques: Painting over embossed text. Doodling with rubons
Cardstock: Bazzil
Stamps: Inque Boutique alpha
Ink: Colorbox orange
Pens: Zig
Rub-ons: 7 Gypsies
In Kids Magazines, I used the same rub-on package from Water Bottle Obsession.

Journaling: Everyday Zoey bolts to the mailbox in hopes of receiving a kid’s magazine (aka toy catalog.) When she gets one, she immediately gets out a pencil and goes through each page, circling all the wonderful toys, She carries her magazine everywhere and saves them until they disintegrate. She shows them to anyone who will look and we discuss them at bedtime. Her favorite kid magazine is Toys To Grow On. It is just so cute to see her so in love. Photos from 12.07 studying at the kitchen table.
Techniques: doodling with rub-ons
Cardstock: unknown
Pattern paper: MOD
Stamps: Inque Boutique (big lined paper) and Fontwerks (the small lined paper)
Ink: Ranger Black soot
Pens: micron, zig
Ribbon: KI Memories
Buttons: KI Memories Softies
Rub-ons: MaisyMo flowers
Other: Tim Holtz grungeboard alphabet, acrylic paint, stickles, brads: KI Memories
The final technique that I would like to cover is doodling on rub-ons. I did this on Woah Baby with my title. This allowed me to personalize it a bit more. I used paint pens and soufflé pens for this technique. The original rub-on was black, just so you know.

Techniques: painting and doodling on rub-ons
Cardstock: Bazzil
Pattern paper: Stripe, flowered, turquoise and doodle black: Love, Elsie by KI Memories: Zoe; Polka dot black unknown manufacturer; graph paper is from KI memories packaging
Stamps: KI Memories large flower; Fontwerks lined paper
Stickers: KI Memories: Pop Culture; Love, Elsie by KI Memories
Ink: Ranger Black Soot
Pens: Micron; Souflee; Sharpie paint pens;
Buttons: KI Memories; Joanns Essentials; clear button is Foof-a-la
Ribbon: Rainbow and dream KI Memories; fiber and polka dot are unknown manufacturer
Rub-ons: KI Memories Tatoos
Other: KI Memories paper clip; staples
And finally, another example of doodling with rub-ons is my most recent creation, I Have a Dream. I used a black pen to outline the sea green swoosh and yellow flower in the bottom right corner.


Journaling: I want always to be worthy of your adoring eyes. I want always to be a guide in your life. I want always to be strong so you can steady yourself on me. I want you to know always that I am completely and utterly devoted to you.
Cardstock: Bazzil
Pattern paper: Tinkering Ink
Stamps: Fancy Pants
Stickers: foam butterflies from Joanns
Ink: StazOn, Ranger black soot
Pens: Faber Castell
Rub-ons: Tinkering Ink, MM alphabet
Other: Chipboard: Heidi Swapp; vintage playing cards, plastic flowers, orange frame and gaffer tape from SIStv kit unknown manufacturer; felt: Tinkering Ink; Clear bling: Hero Arts, blue blink: Glitz frosting; ATB Tagger gun used to adhere the flowers
I hope that I’ve given you some new ideas and sparked your creative juices!
Subscribe to:
Posts (Atom)